打造vscode golang开发环境
摘要
vscode golang环境配置以及golang makefile打包配置,ps:为什么不用goland?因为没有元子!囧
windows
版本:go1.22.0
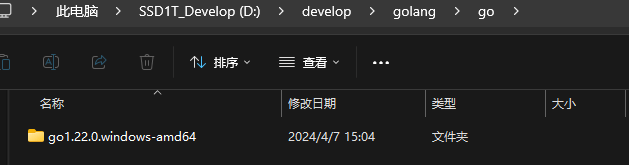
1、安装golang
官方下载地址:https://golang.google.cn/
下载链接:https://dl.google.com/go/go1.22.0.windows-amd64.zip
解压安装到D:\develop\golang\go下,如下
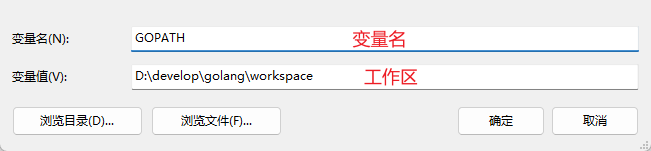
2、创建工作区GOPATH并创建bin,src,pkg目录
D:\develop\golang\workspace
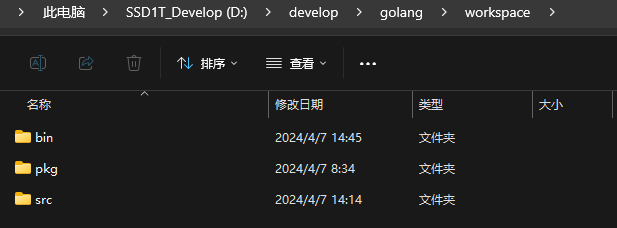
说明:
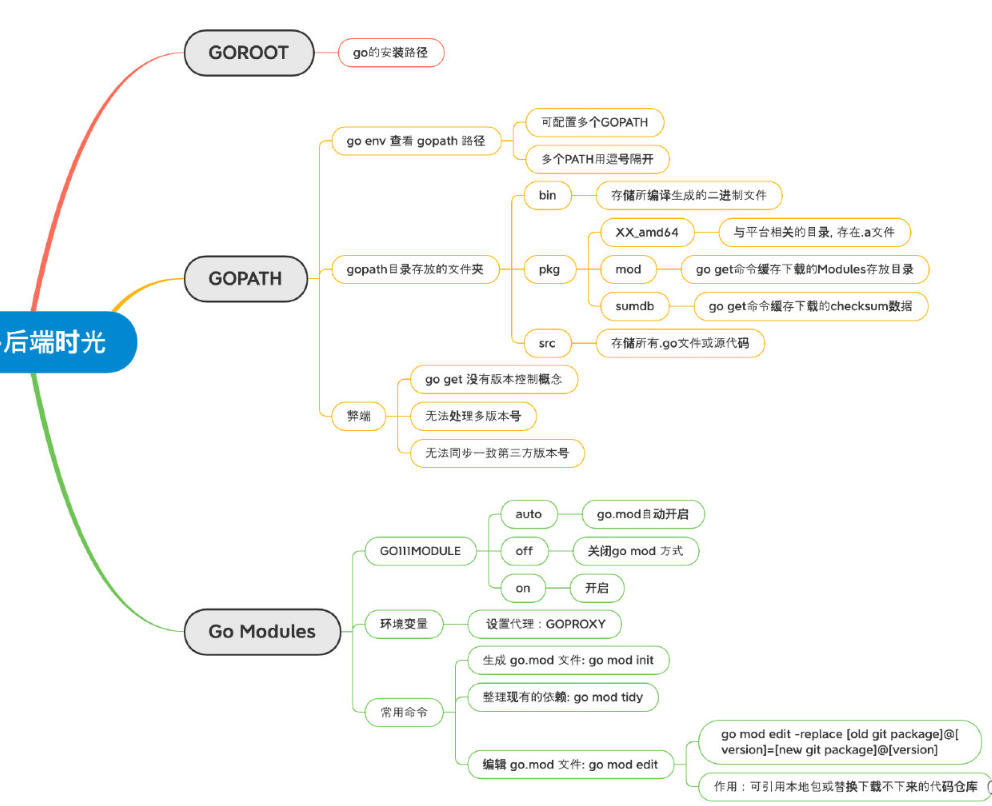
GOPATH 是 Go 语言中使用的一个环境变量,它使用绝对路径提供项目的工作目录(也称为工作区), 是存放 Golang 项目代码的文件路径, GOPATH 适合处理大量 Go语言源码、多个包组合而成的复杂工程。
GOPATH目录一般为:
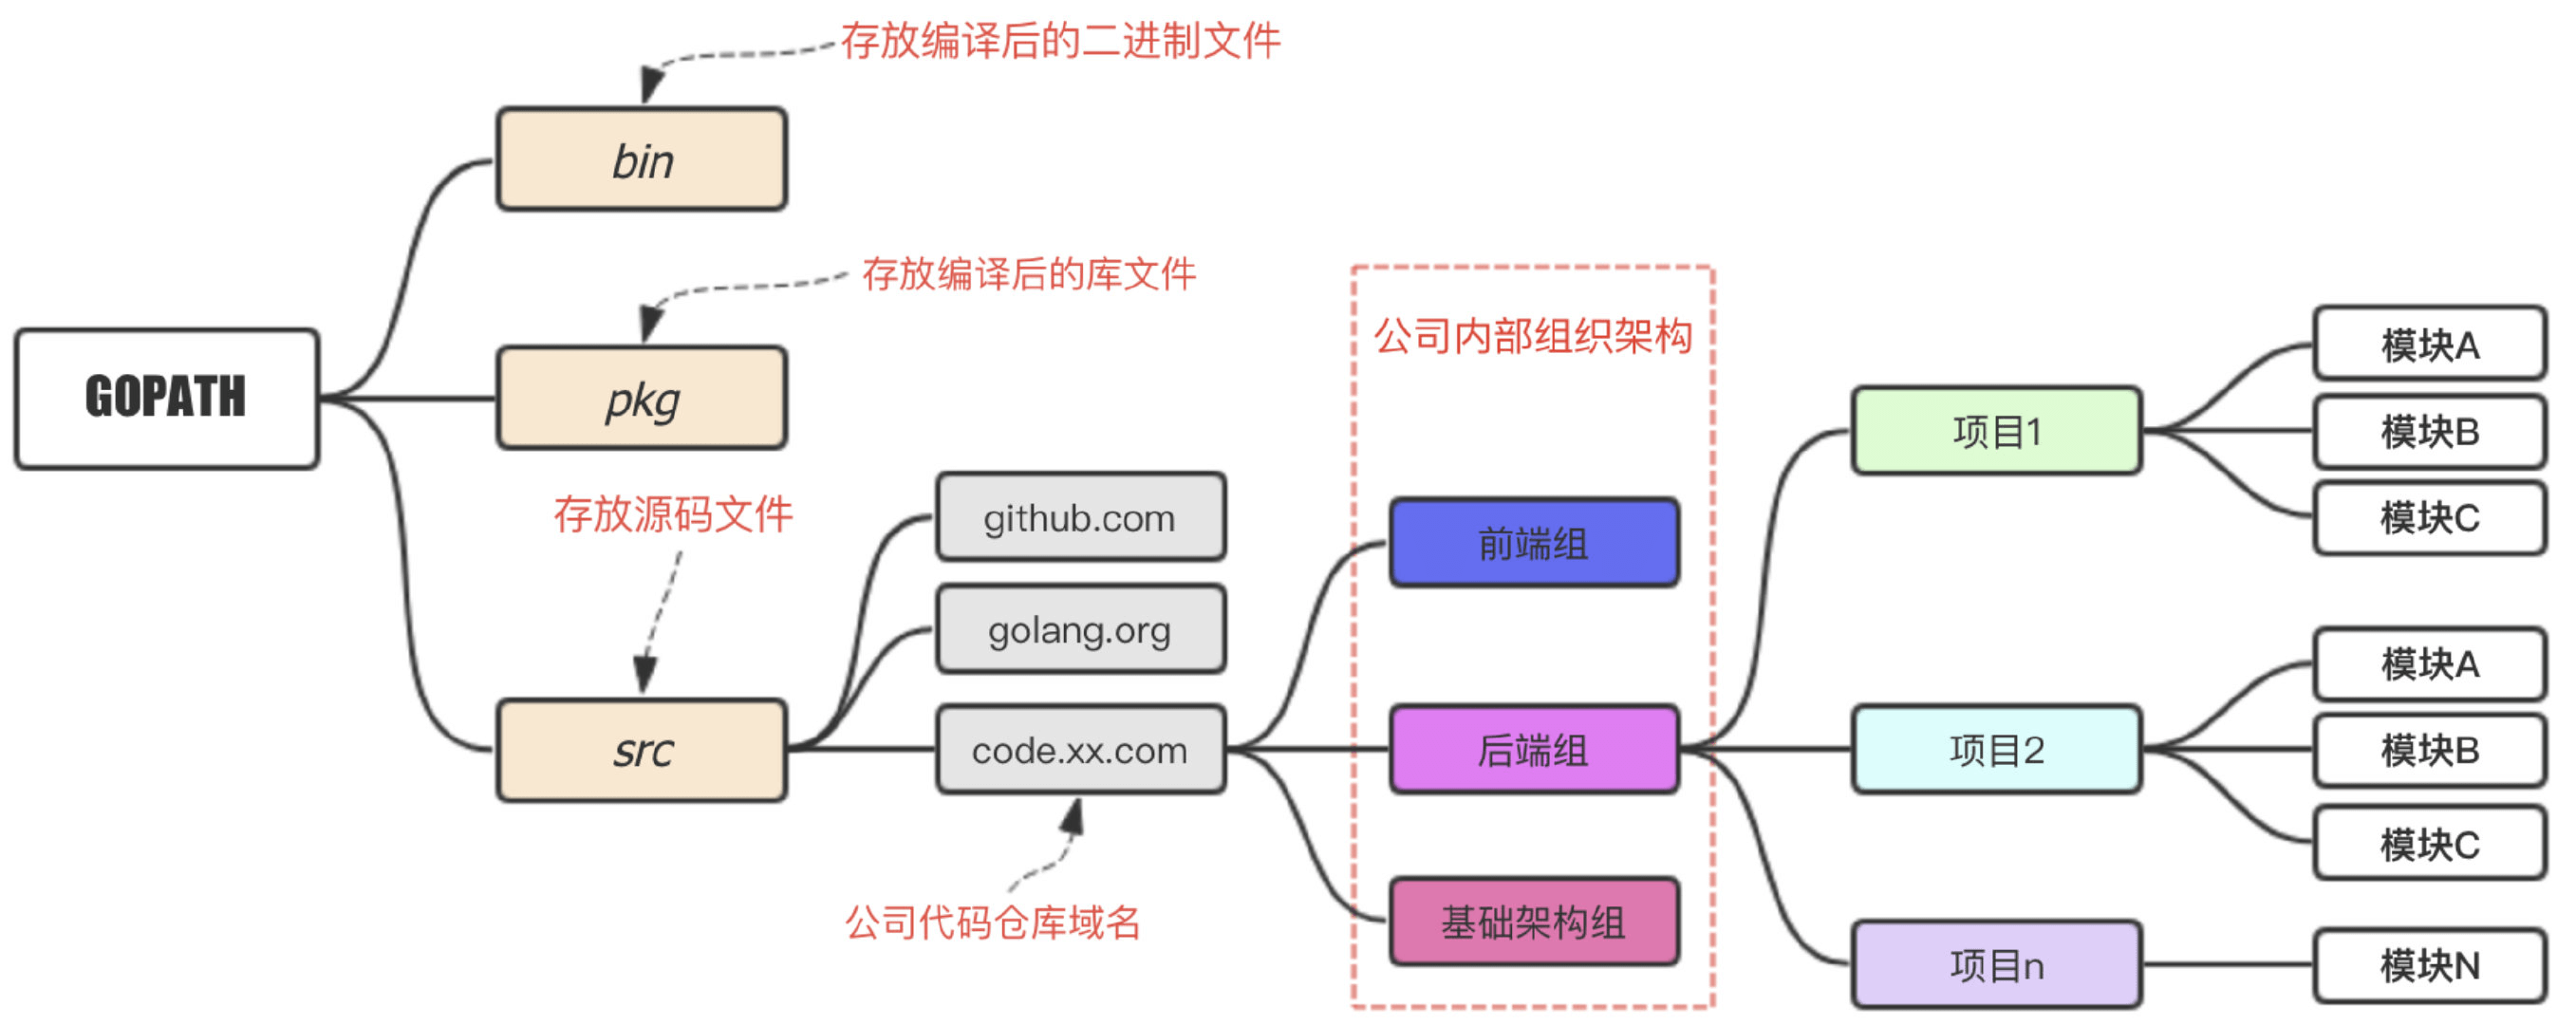
1、bin 存放编译生成的二进制文件。比如 执行命令 go get github.com/google/gops,bin目录会生成 gops 的二进制文件。
2、pkg 其中pkg下面以下三个文件夹。
XX_amd64: 其中 XX 是目标操作系统,比如 mac 系统对应的是darwin_amd64, linux 系统对应的是 linux_amd64,存放的是.a结尾的文件。 mod: 当开启go Modules 模式下,go get命令缓存下依赖包存放的位置 sumdb: go get命令缓存下载的checksum数据存放的位 3、src 存放golang项目代码的位置
如下是一个完整的Go项目的开发目录:
my-go                 // my-go为GOPATH目录
  -- bin
     -- myApp1        // 编译生成
     -- myApp2        // 编译生成
     -- myApp3        // 编译生成
  -- pkg                             依赖包编译后的*.a文件//
  -- src
     -- MyApp1        // 项目1
        -- models
        -- controllers
        -- others
        -- main.go
     -- MyApp2        // 项目2
        -- models
        -- controllers
        -- others
        -- main.go
GOPATH造成问题 在使用 GOPATH 模式下,我们需要将应用代码存放在固定的$GOPATH/src目录下,且如果执行go get使用第三方类库的时候会自动下载并安装到$GOPATH目录下。 项目的Golang代码,和第三方的Golang文件混在一起, 每个如果项目都需要同样的依赖,那么我们就会在不同的GoPath的src中下载大量重复的第三方依赖包,这同样会占用大量的磁盘空间
GOPATH 的缺点
必须指定目录,
go get 命令的时候,无法指定获取的版本
引用第三方项目的时候,无法处理v1、v2、v3等不同版本的引用问题,因为在GOPATH 模式下项目路径都是 github.com/foo/project
无法同步一致第三方版本号,在运行 Go 应用程序的时候,无法保证其它人与所期望依赖的第三方库是相同的版本。
我们给不同的项目设置不同的GoPath,优点非常明显:
便于管理项目,每个项目都是不同的GoPath,这对于我们管理多个Golang项目而言,能够非常清晰的处理项目结构。如果我们把所有项目都放在同一个GoPath的src包下,那么项目的结构就会变得非常混乱,难以管理。
但是当我们需要依赖第三方的包的时候,不同的项目设置不同的GoPath的缺点也非常明显:
第三方依赖的包和我们自己的Golang包混在一起,会给我们的项目文件管理带来一定的麻烦。 不同的GoPath都需要下载依赖,那么磁盘中重复的依赖就会非常多,会占用我们大量的磁盘空间。 所以,设置一个GoPath目录,解决依赖重复的问题,设置不同的GoPath目录,解决Golang项目结构混乱的问题,这本身就是个有争议性的问题。
为了解决这所有的问题,Golang最终引入了GoModule的概念。
什么是GoModule?
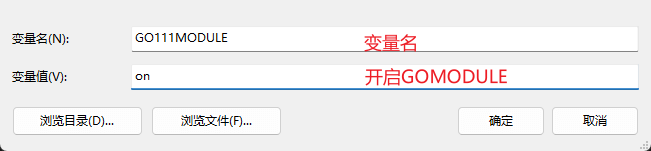
GoModule是Golang在1.11版本初步引入的概念,在1.12版本中正是开始使用,所以如果需要使用GoModule,那么需要保证你的Golang的版本在1.12或以上。 另外需要说一下,Golang1.11和1.12版本虽然已经引入了GoModule的概念,但是GoModule是默认不开启的,如果需要开启,那么需要配置一个环境变量:GO111MODULE=on,默认是off。而在Golang1.13及以上的版本中,GoModule的默认配置为auto,即GoModule会通过你的目录下是否有go.mod文件来判断是否开启GoModule。所以Golang1.13+的版本中我们就不需要配置GO111MODULE属性了。 所以如果你使用GoModule,那么就直接使用Golang1.13+的版本好了!
那么究竟什么是GoModule?
其实说得直白一下,GoModule就是一个用来取代GoPath的Golang的工作空间。 我们之前说过,所有的Golang的文件,都需要放在GoPath目录下才能进行正确的编译和运行,而有了GoModule之后,那么我们就可以把文件放在GoModule目录下,而放在GoModule目录下的Golang文件,也可以正确地编译运行。
那么我们有了GoModule之后,GoPath是不是就可以被舍弃了?
不是的!我们之前说过,GoPath所引出的问题,就是因为第三方类库的包所导致的,所以我们在有了GoModule之后,GoPath和GoModule就分别负责不同的职责,共同为我们的Golang项目服务。GoPath我们用来存放我们从网上拉取的第三方依赖包。GoModule我们用来存放我们自己的Golang项目文件,当我们自己的项目需要依赖第三方的包的时候,我们通过GoModule目录下的一个go.mod文件来引用GoPath目录src包下的第三方依赖即可。这样依赖,既解决了原来只能局限在GoPath目录src包下进行编程的问题,也解决了第三方依赖包难以管理和重复依赖占用磁盘空间的问题。
总而言之,在引入GoModule之后,我们不会直接在GoPath目录进行编程,而是把GoPath作为一个第三方依赖包的仓库,我们真正的工作空间在GoModule目录下。
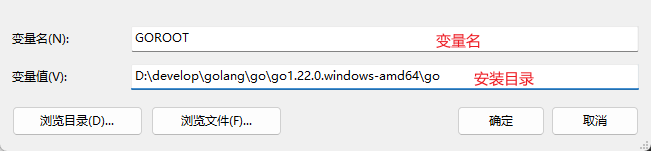
3、设置环境变量
设置变量
设置path可执行路径

设置GO模块代理:
地址:https://goproxy.cn/

测试:
> go version
go version go1.22.0 windows/amd64


> go env
set GO111MODULE=on
set GOARCH=amd64
set GOBIN=
set GOCACHE=C:\Users\xxx\AppData\Local\go-build
set GOENV=C:\Users\xxx\AppData\Roaming\go\env
set GOEXE=.exe
set GOEXPERIMENT=
set GOFLAGS=
set GOHOSTARCH=amd64
set GOHOSTOS=windows
set GOINSECURE=
set GOMODCACHE=D:\develop\golang\workspace\pkg\mod
set GONOPROXY=
set GONOSUMDB=
set GOOS=windows
set GOPATH=D:\develop\golang\workspace
set GOPRIVATE=
set GOPROXY=https://goproxy.cn
set GOROOT=D:\develop\golang\go\go1.22.0.windows-amd64\go
set GOSUMDB=sum.golang.org
set GOTMPDIR=
set GOTOOLCHAIN=auto
set GOTOOLDIR=D:\develop\golang\go\go1.22.0.windows-amd64\go\pkg\tool\windows_amd64
set GOVCS=
set GOVERSION=go1.22.0
set GCCGO=gccgo
set GOAMD64=v1
set AR=ar
set CC=gcc
set CXX=g++
set CGO_ENABLED=0
set GOMOD=NUL
set GOWORK=
set CGO_CFLAGS=-O2 -g
set CGO_CPPFLAGS=
set CGO_CXXFLAGS=-O2 -g
set CGO_FFLAGS=-O2 -g
set CGO_LDFLAGS=-O2 -g
set PKG_CONFIG=pkg-config
set GOGCCFLAGS=-m64 -fno-caret-diagnostics -Qunused-arguments -Wl,--no-gc-sections -fmessage-length=0 -ffile-prefix-map=C:\Users\xxx\AppData\Local\Temp\go-build4132137718=/tmp/go-build -gno-record-gcc-switches
4、golang多版本管理
方案一:go install
查看golang所有版本:https://golang.google.cn
例:以安装go1.18.10为例
# 注意是安装时路径是golang.org
go install golang.org/dl/go1.18.10@latest
go1.18.10  download

# 使用
go1.18.10  version
方案二:gvm版本管理器
github地址:https://github.com/moovweb/gvm
5、安装vscode并安装插件
(1)设置vscode更新方式(可略)
打开 vscode → 文件 → 首选项 → 设置→ 在上方搜索栏搜索「更新」,找到「Update: Mode」→ 选择 manual,这样软件不会自动更新,但是你可以自己手动检查更新
(2)配置windows vscode(可略)
配置以下功能:
- 右键文件用vscode打开文件
- 右键文件夹用vscode打开文件夹
- 右键空白区域用vscode打开
右键文件用vscode打开文件
- Win+R 打开运行,输入regedit,打开注册表,找到HKEY_CLASSES_ROOT => * => shell分支,如果没有shell分支,则在*下点击右键,选择“新建-项”,建立shell分支。
- 在shell下新建“vscode”项,在右侧窗口的“默认”双击,在数据里输入“用vscode打开文件”。这是右键上显示的文字,可以随便写
- 在“vscode”下再新建Command项,在右侧窗口的“默认”键值栏内输入程序所在的安装路径,我的是:"D:\devtools\web\VSCode-win32-x64-1.89.1\Code.exe" "%1"。其中的%1表示要打开的文件参数。
右键文件夹用vscode打开文件夹
- Win+R 打开运行,输入regedit,打开注册表,找到HKEY_CLASSES_ROOT => Directory => shell分支
- 在shell下新建“vscode”项,在右侧窗口的“默认”双击,在数据里输入“用vscode打开文件夹”。这是右键上显示的文字,可以随便写
- 在“vscode”下再新建Command项,在右侧窗口的“默认”键值栏内输入程序所在的安装路径,我的是:"D:\devtools\web\VSCode-win32-x64-1.89.1\Code.exe" "%1"。其中的%1表示要打开的文件夹参数。
右键空白区域用vscode打开
- Win+R 打开运行,输入regedit,打开注册表,找到HKEY_CLASSES_ROOT => Directory => Background => shell分支
- 在shell下新建“vscode”项,在右侧窗口的“默认”双击,在数据里输入“用vscode打开”。这是右键上显示的文字,可以随便写
- 在“vscode”下再新建Command项,在右侧窗口的“默认”键值栏内输入程序所在的安装路径,我的是:"D:\devtools\web\VSCode-win32-x64-1.89.1\Code.exe" "%v"。%v为参数
说明:D:\devtools\web\VSCode-win32-x64-1.89.1\Code.exe为Vscode的安装路径,根据各自环境修改。
(3)vscode设置cmder终端(可略)
终极推荐:cmder终端,windows最强终端,比cmd,powershell等强太多了。
官方下载地址:https://github.com/cmderdev/cmder
建议下载完整包cmder.zip,里面包含git等命令
vscode设置cmder终端官方wiki:https://github.com/cmderdev/cmder/wiki/Seamless-VS-Code-Integration
	// 设置cmder
	"terminal.integrated.defaultProfile.windows": "Cmder",
    "terminal.integrated.profiles.windows": {
        "Cmder": {
            "name": "Cmder",
            "path": [
                "${env:windir}\\Sysnative\\cmd.exe",
                "${env:windir}\\System32\\cmd.exe"
            ],
            "args": ["/k", "D:\\devtools\\other\\cmder\\vendor\\bin\\vscode_init.cmd"],
            "icon": "terminal-cmd",
            "color": "terminal.ansiGreen"
        },
    },
说明:args部分的"D:\devtools\other\cmder"为我自己的安装路径,按各自环境修改,其余不变
(4)安装Go插件
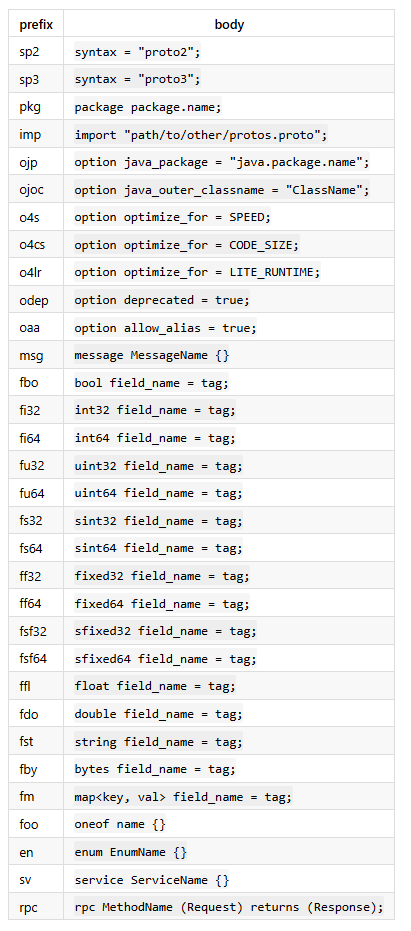
插件推荐:Go、Code Runner、GoComment、vscode-proto3:


Go插件
前提:由于go插件相关包在国外,国内无法下载,需要设置go代理环境变量,go env -w GO111MODULE=ongo env -w GOPROXY=https://goproxy.io,direct
更新 Go 工具:
ctrl + shift + P 搜索 Go: Install/Update Tools
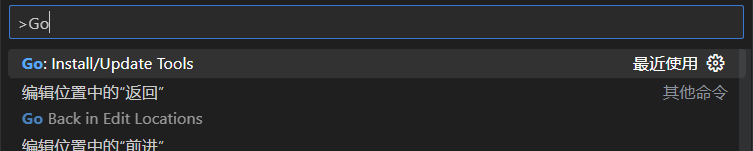
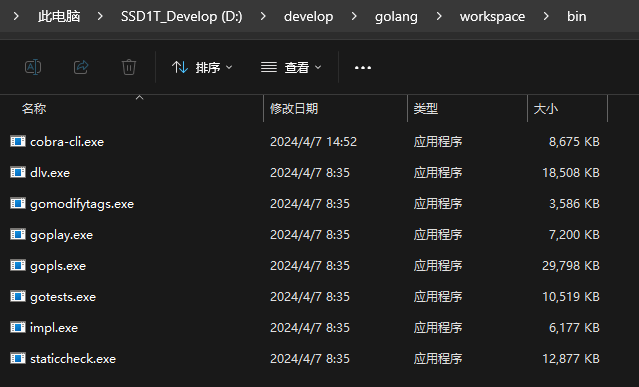
全部选择好后,点确定后开始安装(需要代理):
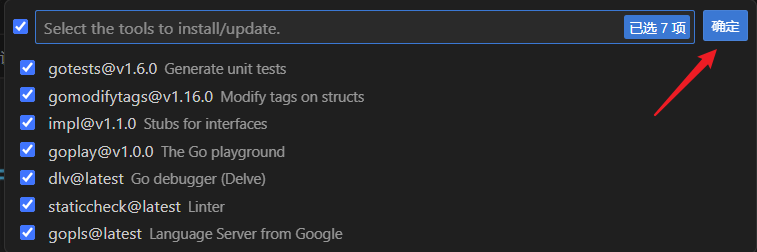
可以看到有一些 exe 文件被安装到了我设置的 工作区\bin 目录下:
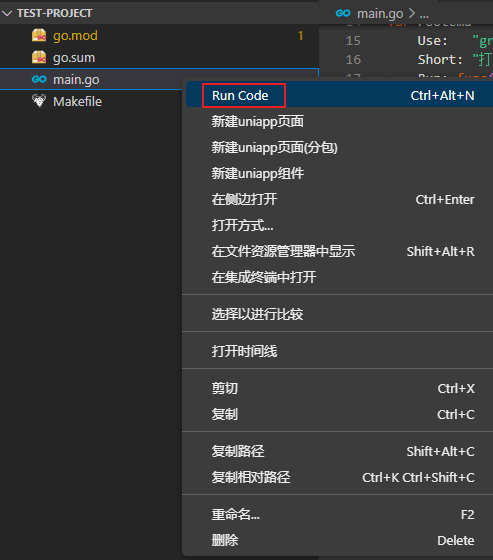
Code Runner插件
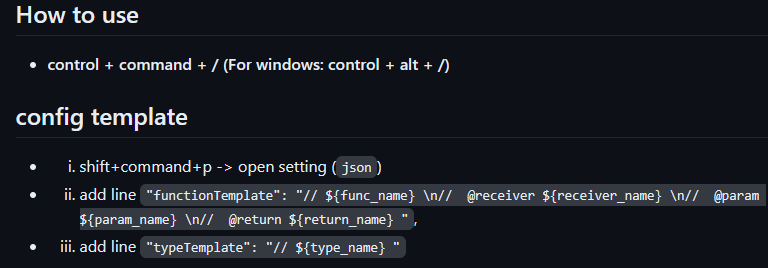
GoComment插件
vscode-proto3插件
6、vscode快捷键
pkgm:生成main包+main主函数
tys:快捷构建结构体
ff:fmt.Printf格式化输出
fp:fmt.Println换行输出
for:for循环
forr:for range
命令补全
{
	"Print to console": {
		"scope": "javascript,typescript",
		"prefix": "clg",
		"body": [
			"console.log('$1');",
			"$2"
		],
		"description": "Log output to console"
	},
	"golang Printf var": {
		"prefix": "gv",
		"body": [
			"$1 := $2",
			"fmt.Printf(\"$1: %v\\n\", $1)"
		],
		"description": "定义变量并打印 var := "
	},
	"golang Printf var, _ :=": {
		"prefix": "gvh",
		"body": [
			"$1, _ := $2",
			"fmt.Printf(\"$1: %v\\n\", $1)"
		],
		"description": "定义变量并打印 var, _ := "
	},
	"golang var, err :=": {
		"prefix": "gve",
		"body": [
			"$1, err := $2",
			"if err != nil {",
			"",
			"  return",
			"}",
			"fmt.Printf(\"$1: %v\\n\", $1)"
		],
		"description": "定义变量并打印 var, err := "
	},
	"h5": {
		"prefix": "h5", // 触发的关键字 输入vh按下tab键
		"body": [
			"<!DOCTYPE html>",
			"<html lang=\"en\">\n",
			"<head>",
			"   <meta charset=\"UTF-8\">",
			"   <meta name=\"viewport\" content=\"width=device-width, initial-scale=1.0\">",
			"   <meta http-equiv=\"X-UA-Compatible\" content=\"ie=edge\">",
			"   <title>Document</title>",
			"   <style>\n",
			"   </style>",
			"</head>\n",
			"<body>",
			"   <div>",
			"     $0",
			"   </div>",
			"</body>\n",
			"</html>",
		],
		"description": "h5 template"
	},
	"vue3 ts template": {
		"prefix": "v3",
		"body": [
			"<script setup lang=\"ts\">",
			"import { ref } from 'vue'\n",
			"",
			"</script>",
			"<template>",
			"  <div>",
			"    $0",
			"  </div>",
			"</template>",
			"<style lang=\"scss\" scoped>\n",
			"</style>"
		],
		"description": "Vue3 typescript template"
	},
	"vue2 template": {
		"prefix": "v2",
		"body": [
			"<template>",
			"  <div>\n",
			"    $0",
			"  </div>",
			"</template>",
			"<script>",
			"export default {",
			"  name:'',",
			"  data() {",
			"  return {\n",
			"    }",
			"  },",
			"  methods:{\n",
			"  },",
			"}",
			"</script>",
			"<style lang=\"scss\" scoped>\n",
			"</style>\n",
		],
		"description": "vue2 template"
	},
	"vh": {
		"prefix": "vh",
		"body": [
			"<!DOCTYPE html>",
			"<html lang=\"en\">\n",
			"<head>",
			"  <meta charset=\"UTF-8\">",
			"  <meta name=\"viewport\" content=\"width=device-width, initial-scale=1.0\">",
			"  <meta http-equiv=\"X-UA-Compatible\" content=\"ie=edge\">",
			"  <title>Document</title>",
			"  <script src=\"./lib/vue-2.4.0.js\"></script>",
			"  <style>\n",
            "  </style>",
			"</head>\n",
			"<body>",
			"  <div id=\"app\">\n",
			"    $0",
			"  </div>",
			"  <script>",
			"  var vm = new Vue({",
			"    el:'#app',",
			"    data() {",
			"      return {\n",
			"      }",
			"    },",
			"    methods:{\n",
			"    },",
			"  });",
			"  </script>",
			"</body>\n",
			"</html>",
		],
		"description": "vh template"
	},
	"async-function-arrow": {
		"prefix": "vf",
		"body": [
			"// $1",
			"const resultList = ref<type>()",
			"const ${2:FuncName} = async () => {",
			"  const res = await ${3:API()}",
			"  console.log(res)",
			"}"
		],
		"description": "箭头Async函数",
	},
}
7、golang项目目录结构
参考:
golang-standards/project-layout: Standard Go Project Layout (github.com)
源码地址:stylite1024/golang-web (github.com)
.
├── cmd
│   ├── root.go
│   └── version.go
├── config
│   └── info.go
├── docker-compose.yml
├── Dockerfile
├── docs
├── go.mod
├── go.sum
├── internal
│   ├── handler
│   │   └── handler.go
│   ├── logger
│   │   └── logger.go
│   ├── logic
│   └── router
│       └── router.go
├── LICENSE
├── main.go
├── Makefile
├── pkg
│   └── util
│       └── response.go
├── README.md
├── README-zh.md
├── scripts
│   └── docker-entrypoint.sh
└── web
    ├── static
    │   ├── favicon.ico
    │   └── index.html
    └── static.go
8、安装make命令编译工具mingw
MinGW 介绍
MinGW 的全称是:Minimalist GNU on Windows 。是将经典的开源 C语言 编译器 GCC 移植到了 Windows 平台下,并且包含了 Win32API ,因此可以将源代码编译为可在 Windows 中运行的可执行程序。
而且还可以使用一些 Windows 不具备的,Linux平台下的开发工具。
一句话来概括:MinGW 就是 GCC 的 Windows 版本 。
MinGW-w64 与 MinGW 的区别
MinGW-w64 与 MinGW 的区别在于 MinGW 只能编译生成32位可执行程序,而 MinGW-w64 则可以编译生成 64位 或 32位 可执行程序。
正因为如此,MinGW 现已被 MinGW-w64 所取代,且 MinGW 也早已停止了更新,内置的 GCC 停滞在了 4.8.1 版本,而 MinGW-w64 内置的 GCC 则更新到了 8.1.0 版本。
安装MinGW-w64
下载地址:https://sourceforge.net/projects/mingw-w64/files/
下载这个:https://sourceforge.net/projects/mingw-w64/files/Toolchains%20targetting%20Win64/Personal%20Builds/mingw-builds/8.1.0/threads-win32/seh/x86_64-8.1.0-release-win32-seh-rt_v6-rev0.7z
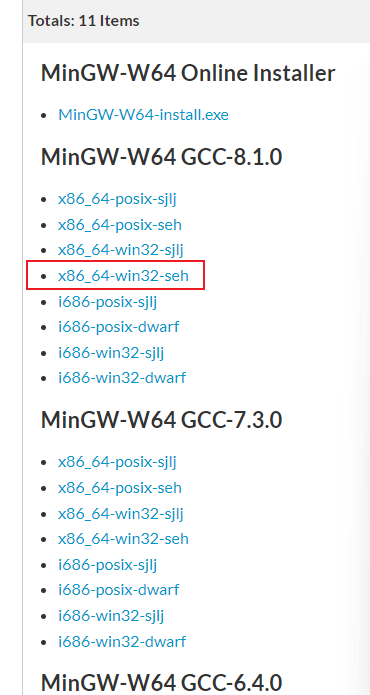
解压,将bin下的mingw32-make.exe重命名成make.exe,设置系统环境PATH路径,即可使用了。
附相关博文:
Windows下MinGW-w64的安装: https://zhuanlan.zhihu.com/p/355510947 Mingw快捷安装教程 并完美解决出现的下载错误:The file has been downloaded incorrectly: https://blog.csdn.net/yvge669/article/details/124564622
Makefile参考1
源码地址:stylite1024/golang-web (github.com)
# 参考:https://github.com/adnanh/webhook/blob/master/Makefile
# 二进制包名
# BINARY ?=$(shell grep "AppName.*=" config/info.go | awk  -F'"' '{print $2}')
BINARY	?=$(shell grep "AppName.*=" config/info.go | grep -oP '"\K[^"]+')

# 版本号
VERSION	?=$(shell grep "Version.*=" config/info.go | grep -oP '"\K[^"]+')

# go版本
# GO_VERSION ?= $(shell go version | grep -o '[0-9]\+.[0-9]\+.[0-9]\+')
GO_VERSION	?= $(shell grep '^go' go.mod | cut -d' ' -f2)

# 设置当前的GOOS和GOARCH
# 系统平台,如linux、windows
GOOS	?= $(shell go env GOOS)
# 系统架构,如amd64
GOARCH	?= $(shell go env GOARCH)

# 查看支持操作系统和架构命令:go tool dist list
# 定义可以打包的操作系统列表
PLATFORMS	:= windows linux darwin
# 定义可以打包的架构列表
ARCHES	:= amd64 arm64 386

# 打包docker镜像变量
DOCKERFILE_PATH         ?= ./Dockerfile
DOCKERBUILD_CONTEXT     ?= ./
DOCKER_NAMESPACE		?= go-app

# 使用内置目标名.PHONY声明这些“伪目标”名是“伪目标”,而不是与“伪目标”同名的文件
.PHONY: help update run build build-image build-run-container remove-image remove-container push-image build-push-image all clean

default: help

update:
	@go mod tidy

run: update
	@go run .

build: update
ifeq ("$(GOOS)", "windows")
	@CGO_ENABLED=0 GOOS=${GOOS} GOARCH=${GOARCH} go build -ldflags "-s -w" -o ./bin/${BINARY}.exe  .
else
	@CGO_ENABLED=0 GOOS=${GOOS} GOARCH=${GOARCH} go build -ldflags "-s -w" -o ./bin/${BINARY}  .
endif

build-image: remove-container remove-image
# @docker build -t  ${DOCKER_REPO}/${BINARY}:${VERSION} -f ${DOCKERFILE_PATH} --build-arg GOVERSION="${GO_VERSION}" ${DOCKERBUILD_CONTEXT}
	@docker build -t  ${BINARY}:${VERSION} -f ${DOCKERFILE_PATH} --build-arg GOVERSION="${GO_VERSION}" ${DOCKERBUILD_CONTEXT}
	@docker tag ${BINARY}:${VERSION} ${BINARY}:latest

build-run-container: remove-container build-image
	@docker run -d --name ${BINARY} ${BINARY}:${VERSION}
	@docker ps|grep ${BINARY}

remove-image: remove-container
	@docker rmi -f ${BINARY}:latest
	@docker rmi -f ${BINARY}:${VERSION}

remove-container:
	@docker rm -f ${BINARY}

push-image:
	@docker tag	${BINARY}:${VERSION} ${DOCKER_NAMESPACE}/${BINARY}:${VERSION}
	@docker tag ${BINARY}:latest ${DOCKER_NAMESPACE}/${BINARY}:latest
	@docker push ${DOCKER_NAMESPACE}/${BINARY}:${VERSION}
	@docker push ${DOCKER_NAMESPACE}/${BINARY}:latest

build-push-image: build-image push-image

all: update
	@for platform in $(PLATFORMS); do \
		for arch in $(ARCHES); do \
			echo "building  ${BINARY}-$${platform}-$${arch}  binary file..."; \
			GOOS=$${platform} GOARCH=$${arch} go build -ldflags "-s -w" -o "./bin/${BINARY}-$${platform}-$${arch}" .; \
		done; \
	done

clean:
	@if [ -d bin ] ; then rm -rf ./bin ; fi
	@echo "clean successful"

help:
	@echo "usage: make <option>"
	@echo "options and effects:"
	@echo "	help				: Show help"
	@echo "	update				: Run 'go mod tidy'"
	@echo "	Run					: Run 'go run .'"
	@echo "	Build				: Build the binary of this project for current platform"
	@echo "	build-image			: Build docker image"
	@echo "	build-run-container	: Build docker image and run docker container"
	@echo "	remove-images		: Remove docker image"
	@echo "	remove-container	: Remove docker container"
	@echo "	all 				: Build multiple platform multiple arch binary of this project"
	@echo "	clean				: Cleaning up all the generated binary files"
Makefile参考2
APP := $(shell cat go.mod | grep "^module " | sed -e "s/module //g")
VERSION  = $(shell git describe --tags --always)
REVISION = $(shell git rev-parse --short HEAD)
BRANCH = $(shell git rev-parse --abbrev-ref HEAD)
BUILD_USER = ${shell git show -s --format=%an}
BUILD_DATE = $(shell date -R)
GOARCH := $(shell go env GOARCH)
GOOS := $(shell go env GOOS)

define LDFLAGS
"
-w -s \
-X 'github.com/prometheus/common/version.Version=${VERSION}' \
-X 'github.com/prometheus/common/version.Revision=${REVISION}' \
-X 'github.com/prometheus/common/version.Branch=${BRANCH}' \
-X 'github.com/prometheus/common/version.BuildUser=${BUILD_USER}' \
-X 'github.com/prometheus/common/version.BuildDate=${BUILD_DATE}' \
"
endef
SERVER_MAIN_FILE="src/modules/server/server.go"
AGENT_MAIN_FILE="src/modules/agent/agent.go"
GOBUILD_SERVER=CGO_ENABLED=0 go build -a -ldflags ${LDFLAGS}
GOBUILD_AGENT=CGO_ENABLED=0 go build -a -ldflags ${LDFLAGS}

# 使用内置目标名.PHONY声明这些“伪目标”名是“伪目标”,而不是与“伪目标”同名的文件
.PHONY: help all build windows linux darwin

default:help

all:build windows linux darwin ls

server:
	@${GOBUILD_SERVER} -o ./bin/${APP}-server  ${SERVER_MAIN_FILE}
agent:
	@${GOBUILD_AGENT} -o ./bin/${APP}-agent ${AGENT_MAIN_FILE}
build:
	@${GOBUILD_SERVER} -o ./bin/${APP}-server ${SERVER_MAIN_FILE}
	@${GOBUILD_AGENT} -o ./bin/${APP}-agent ${AGENT_MAIN_FILE}
windows:
	@GOOS=windows ${GOBUILD_SERVER} -o ./bin/${APP}-server-${VERSION}-windows-${GOARCH}.exe ${SERVER_MAIN_FILE}
	@GOOS=windows ${GOBUILD_AGENT} -o ./bin/${APP}-agent-${VERSION}-windows-${GOARCH}.exe ${AGENT_MAIN_FILE}
linux:
	@GOOS=linux ${GOBUILD_SERVER} -o ./bin/${APP}-server-${VERSION}-linux-${GOARCH} ${SERVER_MAIN_FILE}
	@GOOS=linux ${GOBUILD_AGENT} -o ./bin/${APP}-agent-${VERSION}-linux-${GOARCH} ${AGENT_MAIN_FILE}
darwin:
	@GOOS=darwin ${GOBUILD_SERVER} -o ./bin/${APP}-server-${VERSION}-darwin-${GOARCH} ${SERVER_MAIN_FILE}
	@GOOS=darwin ${GOBUILD_AGENT} -o ./bin/${APP}-agent-${VERSION}-darwin-${GOARCH} ${AGENT_MAIN_FILE}
ls:
	@ls ./bin

clean:
	@echo "Cleaning up all the generated files"
	@if [ -d bin ] ; then rm -rf ./bin ; fi

help:
	@echo "usage: make <option>"
	@echo "options and effects:"
	@echo "    help   	: Show help"
	@echo "    all    	: Build multiple binary of this project"
	@echo "    build  	: Build the binary of this project for current platform"
	@echo "    windows	: Build the windows binary of this project"
	@echo "    linux  	: Build the linux binary of this project"
	@echo "    darwin 	: Build the darwin binary of this project"
	@echo "    clean  	: Cleaning up all the generated files"
使用
make
make build
9、缩减Golang编译后文件大小的三种方法
推荐文章:https://zhuanlan.zhihu.com/p/313053187?utm_id=0
总结:(推荐下面两个方法一起用,gccgo可能不支持相关go版本且太复杂,不推荐)
# 方法一: 优化编译标志,使用-ldflags "-s -w"去掉调试信息和符号表
go build -ldflags "-s -w" -o main.exe  main.go

# 方法二: 使用UPX压缩可以减小二进制文件的大小,但可能会使程序运行时变慢。-o 指定压缩后的文件名。-9指定压缩级别,1-9
upx -9 -o main-compress.exe  main.exe
10、go build编译后为exe程序添加ico图标
下载工具resourcehacker,地址:https://www.angusj.com/resourcehacker/#download,zip版本解压
ResourceHacker.exe -open main.exe -save output.exe -action addskip -res icon.ico -mask ICONGROUP,MAIN,
# 命令说明:
main.exe为go build打包后的exe文件
output.exe为添加ico图标完成后的exe文件
icon.ico为ico图标
ICO图标在线生成工具:http://tools.jb51.net/aideddesign/ico_img
11、使用Air实现Go程序实时热重载
顾名思义,air能够提高开发效率。
github:https://github.com/air-verse/air
它支持以下特性:
- 彩色的日志输出
- 自定义构建或必要的命令
- 支持外部子目录
- 在 Air 启动之后,允许监听新创建的路径
- 更棒的构建过程
安装
使用 Go 的版本为 1.22 或更高:
go install github.com/air-verse/air@latest
使用
在项目的根目录下创建 air.toml 文件
root = "."
tmp_dir = "tmp"

[build]
pre_cmd = []
cmd = "go build -o ./tmp/main.exe ."
post_cmd = []
#bin = "tmp/main.exe"
bin = "tmp/main.exe"
#full_bin = "SET APP_ENV=dev & SET APP_USER=air & ./tmp/main.exe"
full_bin = "./tmp/main.exe"
args_bin = []
include_ext = ["go", "tpl", "tmpl", "html"]
exclude_dir = ["assets", "tmp", "vendor", "frontend/node_modules"]
include_dir = []
include_file = []
exclude_file = []
exclude_regex = ["_test\\.go"]
exclude_unchanged = true
follow_symlink = true
log = "air.log"
poll = false
poll_interval = 500 # ms
delay = 0 # ms
stop_on_error = true
send_interrupt = false
kill_delay = 500 # nanosecond
rerun = false
rerun_delay = 500

[log]
time = false
main_only = false

[color]
main = "magenta"
watcher = "cyan"
build = "yellow"
runner = "green"

[misc]
# Delete tmp directory on exit
clean_on_exit = true

[screen]
clear_on_rebuild = true
keep_scroll = true

[proxy]
  enabled = false
  proxy_port = 8090
  app_port = 8080
热重载命令
air.exe -c air.toml
更方便的使用方法
# air.exe init 初始化,执行完成后会生成.air.toml,以后只需要执行air.exe即可
air.exe init
air.exe
更多文章请关注我的公众号,自动推送更新